Advanced binary fuzzing using AFL++-QEMU and libprotobuf: a practical case of grammar-aware in-memory persistent fuzzing
Imagine you identified a function that may be vulnerable in a binary for which you do not have the source code. To help you identify vulnerabilities, you want to fuzz it with the most relevant AFL++ configuration possible. However, as implementing such tooling in practice is not trivial, we decided to summarize our experience and approach in a blog post to help future endeavors.
This blog post describes how to benefit from advanced features of AFL++-QEMU to start grammar-aware in-memory persistent fuzzing on a practical case step by step. We provide all scripts and data (as well as an ELF target) to follow along as you read this post by experimenting on your own. Though encouraged, it is entirely optional; you can also enjoy this post by simply reading through, and we hope you’ll still learn from it!
Binary-only fuzzing: some recurring questions
QEMU is one of the backends supported by AFL++ to handle the instrumentation of binary-only targets.
In practice, this means that, contrary to a target for which the source code is available, you do not recompile the source to obtain an instrumented binary. Instead, AFL++ executes the original binary using a patched version of QEMU’s User Mode Emulation to collect coverage information.
Notes:
- if you want to learn more about QEMU internals, make sure to checkout this series of posts.
- in this post, we only explore the QEMU backend. However, most concepts detailed here should be applicable to other available AFL++ backends.
A very basic execution of fuzzing with QEMU mode (using the -Q flag) is
illustrated in the following figure:

With QEMU mode, different aspects are configurable to optimize fuzzing performance and coverage. The official documentation describes all the features available. Among them:
- Instrumentation and coverage:
AFL_INST_LIBSAFL_QEMU_INST_RANGES
- Mutations:
AFL_CUSTOM_MUTATOR_LIBRARYAFL_CUSTOM_MUTATOR_ONLY
- Execution:
AFL_ENTRYPOINTAFL_QEMU_PERSISTENT_ADDR/AFL_QEMU_PERSISTENT_ADDR_RETAFL_QEMU_PERSISTENT_HOOKAFL_DISABLE_TRIMAFL_DEBUG/AFL_DEBUG_CHILD.
However, going from theory to practice sometimes appears tedious and often raises some recurring questions such as:
- What piece of code do we want covered by the instrumentation?
- What is the best choice for the fuzzer entrypoint?
- What does moving the entrypoint imply on the format of the test cases?
- How can our campaign benefit from the advanced features available in AFL++ to improve performance?
The aim of this article is to see together how we answered these questions on a practical case, from basic configuration to a setup optimized for the target, which could be reused and applied to other similar projects.
Target
A weak X509 parser
The example we chose is inspired by real-life targets we encountered during security evaluations (but cannot redistribute for obvious reasons). It is a binary which expects a filename as input and tries to parse the corresponding file’s content as an X509 certificate.
It contains only a few basic functions:
main: the main function which takes a file as input and callsparse_certwith this file as argument;parse_cert: callsread_fileand gives the read buffer as argument toparse_cert_buf;read_file: opens the file, reads it and returns its content;parse_cert_buf: parses a buffer as a X509 certificate withd2i_X509from theopensslC library, tries to get the CN and print it.
Intentionally, this target contains a trivial vulnerability which we want to
reach during our fuzzing campaign: a stack-based buffer overflow in
parse_cert_buf:
int parse_cert_buf(const unsigned char *buf, size_t len) {
    X509 *cert;
    char cn[MAX_CN_SIZE];

    cert = d2i_X509(NULL, &buf, len);
    ...
    char *subj = X509_NAME_oneline(X509_get_subject_name(cert), NULL, 0);
    strcpy(cn, subj);  // Oops
    printf("Got CN='%s' from certificate\n", cn);
    ...
}
Intentionally too, a dummy init function is added at the beginning of the
main to simulate an initialization phase which would take time and make the
target slow to spin up.
Exploring the target
In real life, targets are obviously not as simple as our weak X509 parser. Indeed, a good fuzzing campaign of a binary-only target always starts with a phase of reverse engineering to:
- understand the target, how it works, how it interacts with its environment, etc.
- identify interesting features to study;
- find functions which might prove to be good targets for fuzzing;
- analyze the call context, structures, user-controlled arguments, etc.
- build a harness or toolchain to call the target function with proper arguments and the fuzzed input;
- generate an initial corpus to get the fuzzer started.
Though some tools (such as fuzzable) exist to help with some of these steps, they most often remain a required, tedious, and manual part of fuzzing binary targets.
Since our example is straightforward, it should not take you too long to find
the vulnerable code, the call trace, and to identify the function of
interest: parse_cert_buf.
00000000000013d4 <parse_cert_buf>:
    13d4: 55                    push   rbp
    13d5: 48 89 e5              mov    rbp,rsp
    13d8: 53                    push   rbx
    13d9: 48 83 ec 68           sub    rsp,0x68
...
    1473: 48 89 d6              mov    rsi,rdx
    1476: 48 89 c7              mov    rdi,rax
    1479: e8 92 fc ff ff        call   1110 <strcpy@plt>
...
    14d9: b8 00 00 00 00        mov    eax,0x0
    14de: 48 8b 5d f8           mov    rbx,QWORD PTR [rbp-0x8]
    14e2: c9                    leave
    14e3: c3                    ret
Note: The addresses you obtain might change depending on your compiler, its version, the options used etc. As long as they are consistent, don’t worry about it!
Now, for the best part: fuzzing this target! For that, follow along the rest of this post :)
Corpus
Collecting inputs
Before anything, we need to collect sample input files to build a corpus. Indeed, the AFL++ documentation states that:
To operate correctly, the fuzzer requires one or more starting files that contain a good example of the input data normally expected by the targeted application.
In our case, since the target parses certificates, we simply generate one using openssl:
$ openssl req -nodes -new -x509 -keyout key.pem -out cert.pem
To make things simpler, we already provide one in the corpus folder.
Pre-processing corpus
Before using this corpus, we can:
- Only retain input samples that lead to distinct execution paths (using
afl-cmin); - Minimize each input sample to preserve its distinct execution path while
making its size as small as possible (using
afl-tmin). This will make future mutations more effective.
We combined these two steps into a single build_corpus.sh script.
Now, assuming you followed the steps in README.md to build AFL++, you can go
ahead and run build_corpus.sh from the step0 directory. This will go through
the corpus minimization steps and get you set up for the next steps.
We should now have all the pre-requisites to actually run AFL++. We’ll dive in the next step, so keep following along!
Instrumentation
AFL++ is a “coverage-guided” fuzzer, meaning that the mutation strategy takes code coverage of previous executions into account to generate new inputs. To build coverage information, AFL++-QEMU needs to know which basic blocks have been reached. This is achieved by instrumenting each basic block to track when it is hit.
Default setup (step0)
By launching AFL++-QEMU by default, as in the step0, all the basic blocks of the target are instrumented, and shared libraries are not included in the instrumentation.
Take note of the exec speed indicator: you can keep an eye on how it evolves
with each step of our post.
Instrumentation tuning (step1)
It is common to study targets for which it is interesting to change this default instrumentation behavior. Reasons can include:
- you are interested in covering all paths possible in the libraries imported by the main binary;
- you want to exclude specific parts of a library for which security has already been tested;
- instrumenting a full huge binary can reduce the execution speed.
To see the range of instrumentation, the following options are available:
AFL_INST_LIBS;AFL_QEMU_INST_RANGES;AFL_CODE_START;AFL_CODE_END.
In our example, while it is crucial to instrument parse_cert_buf, it is less
relevant to instrument main for example, nor shared libraries (e.g.
libssl.so). To configure this, we limit the instrumentation to the function of
interest only. This is done by setting AFL_QEMU_INST_RANGES (see
step1):
- starting at the address of the first instruction of
parse_cert_buf; - ending at the address of the last instruction of
parse_cert_buf.
Note: this could also be done using AFL_CODE_START and AFL_CODE_END in
our case. However, AFL_QEMU_INST_RANGES is more flexible as it allows
specifying multiple ranges to instrument, so we favor this environment variable
instead.
These addresses can be determined manually, or deduced from the objdump
output:
# The base address at which QEMU loads our binary depends on the target
# See https://github.com/AFLplusplus/AFLplusplus/blob/stable/qemu_mode/README.persistent.md#21-the-start-address
case $(file "$target_path") in
  *"statically linked"*)
    QEMU_BASE_ADDRESS=0
    ;;
  *"32-bit"*)
    QEMU_BASE_ADDRESS=0x40000000
    ;;
  *"64-bit"*)
    QEMU_BASE_ADDRESS=0x4000000000
    ;;
  *) echo "Failed to guess QEMU_BASE_ADDRESS"; exit 1
esac

# We use objdump to parse our target binary and obtain the address and size of a given function
function find_func() {
    objdump -t "$target_path" | awk -n /"$1"'$/{print "0x"$1, "0x"$5}'
}

# Some environment variables for AFL++ must be hex encoded
function hex_encode() {
    printf "0x%x" "$1"
}

read fuzz_func_addr fuzz_func_size < <(find_func "parse_cert_buf")
inst_start=$(hex_encode $(("$QEMU_BASE_ADDRESS" + "$fuzz_func_addr")))
inst_end=$(hex_encode $(("$inst_start" + "$fuzz_func_size")))
export AFL_QEMU_INST_RANGES="$inst_start-$inst_end"
$ find_func "parse_cert_buf"
0x00000000000013d4 0x0000000000000110
By enabling AFL++-QEMU’s debug mode (AFL_DEBUG), we can check that the
instrumentation range matches what we want:
Instrument range: 0x40000013d4-0x40000014e4 (<noname>)
From now on, our target is instrumented only for parts of interest and ready to be fuzzed.
Entrypoint
Concept and default behavior
When fuzzing, AFL++ runs the target until a specific address (the AFL
entrypoint) is reached, and then forks from there for each iteration. By
default, the AFL entrypoint is set to the target’s entrypoint (in our
example, target’s _start function).
Indeed, in the default configuration, AFL++ prints the following message:
# from the step0 directory
$ AFL_DEBUG=1 ./fuzz.sh | grep entrypoint
AFL forkserver entrypoint: 0x40000011a0
Disassembling target with objdump confirms the entrypoint is set to the
address of the _start function:
# from the step0 directory
$ objdump -d --start-address=0x11a0 ../src/target | head -n20
00000000000011a0 <_start>:
    11a0: 31 ed                 xor    ebp,ebp
    11a2: 49 89 d1              mov    r9,rdx
    ...
    11b4: 48 8d 3d fa 03 00 00  lea    rdi,[rip+0x3fa]         # 15b5 <main>
    11bb: ff 15 1f 2e 00 00     call   QWORD PTR [rip+0x2e1f]  # 3fe0 <__libc_start_main@GLIBC_2.34>
    ...
With this configuration, the whole target runs for each iteration.
Choice of positioning (step2)
In some cases (like in our example), the initialization phase of the program may
take time. Because initialization is performed for each iteration, there is a
direct impact on fuzzing speed. This is precisely the type of situation that the
AFL_ENTRYPOINT option is intended to address.
Indeed, AFL_ENTRYPOINT can be set to a relevant custom value which will:
- run the initialization phase only once up until the
AFL_ENTRYPOINTaddress is reached; - stop the target at the
AFL_ENTRYPOINTand synchronize with the fuzzer; - let the fuzzer snapshot the target’s state and then proceed with execution
after the
AFL_ENTRYPOINTaddress.
This way, the initialization phase is only run once, before the fork server runs all the iterations, and fuzzing is sped-up.
In our example, the choice of positioning of AFL_ENTRYPOINT was really trivial
since:
- the
initcode doesn’t need to be fuzzed; - the
initphase is deterministic; - the function for which fuzzing is relevant has already been determined
(
parse_cert).
We can thus set the AFL_ENTRYPOINT to the start of the parse_cert function
(see step2):
# Define a custom AFL++ entrypoint executed later than the default (the binary's
# entrypoint)
read fuzz_func_addr fuzz_func_size < <(find_func "parse_cert")
export AFL_ENTRYPOINT=$(hex_encode $(("$QEMU_BASE_ADDRESS" + "$fuzz_func_addr")))
In this configuration, AFL++ prints the following message:
$ AFL_DEBUG=1 ./fuzz.sh | grep entrypoint
AFL forkserver entrypoint: 0x40000014e4
We can confirm that this is the address of parse_cert by disassembling
target with objdump:
$ objdump -d --start-address=0x14e4 ../src/target | head -n10
00000000000014e4 <parse_cert>:
    14e4: 55                    push   rbp
    14e5: 48 89 e5              mov    rbp,rsp
    14e8: 48 83 ec 20           sub    rsp,0x20
Impact on performance
Running the fuzzer lets us see the avantage of adjusting the AFL_ENTRYPOINT:
-
with the default
AFL_ENTRYPOINT:exec speed : 18.24/sec (zzzz...) -
after having adjusted the
AFL_ENTRYPOINT(in order to skip theinitphase):exec speed : 1038/sec
This illustrates that the choice of AFL_ENTRYPOINT is crucial for the
maximization of the number of tests per second the fuzzer can execute.
In the next section, we will see performance can still be further improved by leveraging yet another AFL++ feature: persistent mode.
Persistence
Persistent mode (step3)
Environment variables
“Persistent mode” is a feature allowing AFL++ to avoid calling fork for each
iteration. Instead, it saves the child’s state once it reaches a certain
address (AFL_QEMU_PERSISTENT_ADDR), and restores this state once it reaches
another address (AFL_QEMU_PERSISTENT_RET).
Note: instead of AFL_QEMU_PERSISTENT_RET,
AFL_QEMU_PERSISTENT_RETADDR_OFFSET may be used. If none of these values is
set, AFL++ will instead stop once the first ret instruction is reached (only
if AFL_QEMU_PERSISTENT_ADDR points to the start of a function, otherwise you
must set the value manually).
“Restoring” the state may mean “restoring registers” (AFL_QEMU_PERSISTENT_GPR)
and/or “restoring memory” (AFL_QEMU_PERSISTENT_MEM). As restoring the memory
state is costly, it should only be done when necessary; keep an eye on the
stability value when fuzzing to see if enabling this feature is necessary or
not.
Even when using persistent mode, AFL++ will still call fork from time to time
(every AFL_QEMU_PERSISTENT_CNT iterations, or 1000 by default). If stability
is high enough, increasing this value may improve performance (the max value is
10000).
Applied to our example
In our case, we can start by setting AFL_QEMU_PERSISTENT_ADDR to the same
value as AFL_ENTRYPOINT (the address of the parse_cert function). This way,
AFL++ will restore our process to its state just before it reads the content of
the input file.
Here is the relevant section from afl_config.sh:
read fuzz_func_addr fuzz_func_size < <(find_func "parse_cert")
export AFL_QEMU_PERSISTENT_ADDR=$(hex_encode $(("$QEMU_BASE_ADDRESS" + "$fuzz_func_addr")))
export AFL_QEMU_PERSISTENT_GPR=1
export AFL_QEMU_PERSISTENT_CNT=10000
In our example, stability remains at 100% without having to restore memory
state, so we only set AFL_QEMU_PERSISTENT_GPR. We also increase
AFL_QEMU_PERSISTENT_CNT to its maximum value, as this does not negatively
impact our stability.
You can directly test this using the files provided in the step3 folder. You can also confirm for yourself that the performance boost described in the AFL++ documentation is really there: we get more than 10 times more iterations per second according to our tests!
In-memory fuzzing (step4)
Despite using persistent mode, there are still operations which are needlessly performed by our target before reaching the fuzzed function, notably opening and reading the content of the file generated by the fuzzer. Instead, we can use “in-memory fuzzing” to skip this step by directly reading the input case from the fuzzer’s memory!
Hook
To do so, we have to implement a “hook”. It is actually extremely simple, and its source code is provided in this file:
- we define an
afl_persistent_hook_initfunction which declares whether we want to use in-memory fuzzing or not; - more interesting, we define an
afl_persistent_hookfunction which can override register values and memory at every iteration, right before theAFL_QEMU_PERSISTENT_ADDRaddress is reached. All we have to do is override the memory containing the buffer to parse and set its length in the right register.
Note: you can identify which registers to use by running gdb and breaking
at the start of the target function, or directly by looking at the disassembled
code.
This hook should be compiled as a shared library, which AFL++ will load at runtime.
Environment variables
To instruct AFL++ to use our hook, we simply set AFL_QEMU_PERSISTENT_HOOK to
the path of our .so file:
export AFL_QEMU_PERSISTENT_HOOK="$BASEPATH/src/hook/libhook.so"
As discussed, we want to change AFL_QEMU_PERSISTENT_ADDR to skip the call to
read_file during iterations. There are two options here:
- either we set it at the start address of
base64_decode. In this case, we will also be fuzzing thebase64_decodefunction; -
or we set it at the start of
parse_cert_buf. In this casebase64_decodewill not be fuzzed.Because
base64_decodeis implemented by a trusted external library which we don’t want to fuzz (in this case, OpenSSL), we’ll pick the second option.
Thus, we can move the AFL_QEMU_PERSISTENT_ADDR to the address of
parse_cert_buf:
read fuzz_func_addr fuzz_func_size < <(find_func "parse_cert_buf")
export AFL_QEMU_PERSISTENT_ADDR=$(hex_encode $(("$QEMU_BASE_ADDRESS" + "$fuzz_func_addr")))
Input format
Moving AFL_QEMU_PERSISTENT_ADDR has an impact on our corpus. Indeed, the
buffer generated by the fuzzer is now directly used in parse_cert_buf (without
ever being passed to base64_decode). This means we’ll have to rebuild our
corpus. In our case, it is quite easy: we just need to decode the base64 files
from the previous corpus and save them as raw binary files.
Applied to our example
A quirk of this approach is that, because we are no longer reading data from a
file, the fuzzer no longer needs to create one on disk. However, remember that
our target program expects to read from one or it will immediately exit. Since
the content of this file is no longer relevant (because read_file is no longer
called), we can just manually create an empty placeholder before calling our
program.
You can find this new setup in the step4 folder.
Impact on performance
Overall, in our tests, enabling persistent mode improves performance by a factor of 10 (don’t always expect such a boost in real-life scenarios though!), and the in-memory hook yields an additional twofold improvement:
exec speed : 25.6k/sec
Note: as execution speed is not the only metric that matters, you should of course keep an eye on other indicators such as stability, newly discovered paths, coverage, etc.
Grammar-aware mutator (step5)
Motivations
To recap what we have achieved so far:
- we setup AFL++ to fuzz a binary-only target using QEMU;
- we configured instrumentation to only cover relevant addresses;
- we tweaked the AFL++ entrypoint and enabled persistent mode to shave off initialization time.
In many cases, such a configuration - when combined with multiprocessing which we will briefly touch on later - is enough to run a successful campaign. However, for this example, we decided to fuzz a target handling a highly structured data format. In such a scenario, it may be interesting to introduce new ways of mutating the input data.
Indeed, another tunable aspect of AFL++ is the generation and mutation logic. AFL++ has built-in support for a set of simple (but nonetheless very effective) mutations:
- random bit flips;
- random byte flips;
- arithmetics;
- etc.
In most cases, these mutations are sufficient to explore the code to fuzz. Some data formats have internal constraints that will result in samples being prematurely rejected because these are not met. This is for instance the case for ASN.1, the format used in our example: generating mutations without accounting for these constraints may lead to most samples being immediately discarded as invalid by the target without achieving any added coverage. This means the fuzzing campaign will require time before converging to relevant generated cases.
To address this type of situation, AFL++ allows user to provide their own custom mutators to guide the fuzzer to generate more fitting inputs. As detailed in the official documentation, a custom mutator can be plugged to AFL++ as long as this mutator implements the required API functions.
Implementation
Several options exist to implement grammar-aware mutators in AFL++, one of them being the Grammar Mutator part of the AFL++ project. However, as it doesn’t offer support for ASN.1, we relied instead on libprotobuf, which handles ASN.1.
We took inspiration from the official documentation and existing skeletons to build the “glue” between AFL++ and our custom mutator.
The result lives in custom_mutator.cpp, and implements the following functions from the AFL++ API:
afl_custom_initto initialize our custom mutator;afl_custom_fuzzto mutate the input using our protobuf mutator;afl_custom_post_processto perform post-processing on the mutated data to ensure our target receives correctly formatted input;afl_custom_deinitto cleanup everything.
Input format
Indeed, the afl_custom_post_process function plays an important role: our
custom mutator is based on libprotobuf, and thus needs protobuf data as
input. However, our target can only parse ASN.1 data, we thus need to convert
data from protobuf to ASN.1. Thankfully, the protobuf mutator already
implements this feature in x509_certificate::X509CertificateToDER.
An overview of this whole process is presented below:

As before, we need to adjust the format of the files in our corpus to align with our fuzzing harness. This time around we need to convert our ASN.1 DER files to protobuf. To that end, we implemented a custom script (asn1_to_protobuf.py), which is run once by this step’s build_corpus.sh.
Environment variables
With this, all that is left is to instruct AFL++ to use our custom mutator. For
this, we simply set AFL_CUSTOM_MUTATOR_LIBRARY to the path of our .so file:
export AFL_CUSTOM_MUTATOR_LIBRARY="$BASEPATH/libmutator.so"
We also disable all default mutations and trimming performed by AFL++:
export AFL_DISABLE_TRIM=1
export AFL_CUSTOM_MUTATOR_ONLY=1
Applied to our example
You can find this new setup in the step5 folder.
Impact
This time, it’s not about improving performance, but rather about reaching deeper paths. On our example, which is a very small target, it is quite difficult to measure this impact. However, this would usually be done by comparing coverage and checking if new branches are being reached using the custom mutator.
However, you don’t need to choose between using a custom mutator and using the default AFL++ mutations: you can have the best of both worlds by running several instances of the fuzzer, as we’ll discuss in the next step.
Multiprocessing (step6)
This step is where we bring everything together to run our actual fuzzing campaign. Indeed, in a real campaign, you would not limit yourself to fuzzing on only one core/thread/machine. Thankfully, AFL++ handles running multiple instances in parallel.
However, as stated in the documentation, it is not always useful to run too many instances at once:
On the same machine - due to the design of how AFL++ works - there is a maximum number of CPU cores/threads that are useful, use more and the overall performance degrades instead. This value depends on the target, and the limit is between 32 and 64 cores per machine.
It should be noted that, even before hitting that limit, the increase in performance is not proportional (doubling the number of cores does not double the number of executions per second): an additional overhead is required to synchronize processes.
Varying configuration, mutators, schedules
When running several instances of the fuzzer, coverage can be optimized by using a variety of strategies and configurations in parallel. Because our intent is not to mirror the official AFL++ documentation, we will refer your instead to this section which describes how to use multiple cores while fuzzing.
Nevertheless, as the page is mostly aimed at fuzzing targets where source code is available, some aspects need to be tweaked for binary-only fuzzing.
Binary-only specificities
When fuzzing targets for which source code is available, many features (e.g. ASAN, UBSAN, CFISAN, COMPCOV) require recompiling the target with specific options. Despite recompilation not being an option when dealing with a binary target, some of these features are nonetheless available in QEMU (as documented here).
For example, AFL_USE_QASAN allows automatically injecting a library using
LD_PRELOAD to use
ASAN with QEMU.
Similarly, AFL_COMPCOV_LEVEL allows using
COMPCOV with QEMU,
without the need to recompile the target.
Multi-device setup
For larger fuzzing campaigns, you may use several hosts, each running multiple fuzzer processes. This setup is actually fairly simple, and is well covered in the official documentation. For the sake of simplicity and reproducibility, we did not use multiple machines in the context of this post.
Applied to our example
From the start of this blogpost, the input format and target function changed. You can find a summary of these changes in the following table:
| Configuration | Targeted function | Expected input format |
|---|---|---|
| Default entrypoint | main() |
base64(ASN.1) |
| Custom entrypoint | main() |
base64(ASN.1) |
| In-memory fuzzing | parse_cert_buf() |
ASN.1 / DER |
| Custom mutator | parse_cert_buf() |
protobuf->ASN.1 |
In this step, we run an instance with our custom mutator, and several instances
without this mutator. Thus, we need one corpus in ASN.1 (corpus_unique), and
one in protobuf (corpus_protobuf_unique), with separate output directories.
An example of such multi-corpus setup is available in the
step6 folder. Note that, contrary to other steps, most interesting
changes are in the fuzz.sh file rather than in afl_config.sh.
Prospects on evaluating a campaign
After starting a campaign, you might have to monitor it, evaluate its efficiency, and investigate its results. This is out of scope of this post, and the official documentation gives various details which we don’t aim to repeat here. However, to give you an idea, we will quickly brush over some of these issues.
Monitoring a campaign
AFL++ provides the following tools to monitor running instances’ status:
-
afl-whatsup, which shows the status of instances of the fuzzer running in the background:$ afl-whatsup -s output Summary stats ============= Fuzzers alive : 4 Total run time : 4 minutes, 0 seconds Total execs : 1 millions, 849 thousands Cumulative speed : 30829 execs/sec Average speed : 7707 execs/sec Pending items : 0 faves, 0 total Pending per fuzzer : 0 faves, 0 total (on average) Crashes saved : 3 Cycles without finds : 204/26/1066/264 Time without finds : 1 minutes, 26 seconds -
afl-plot, which can plot the evolution of a specific instance’s metrics over time:$ afl-plot output/afl-main /tmp/plot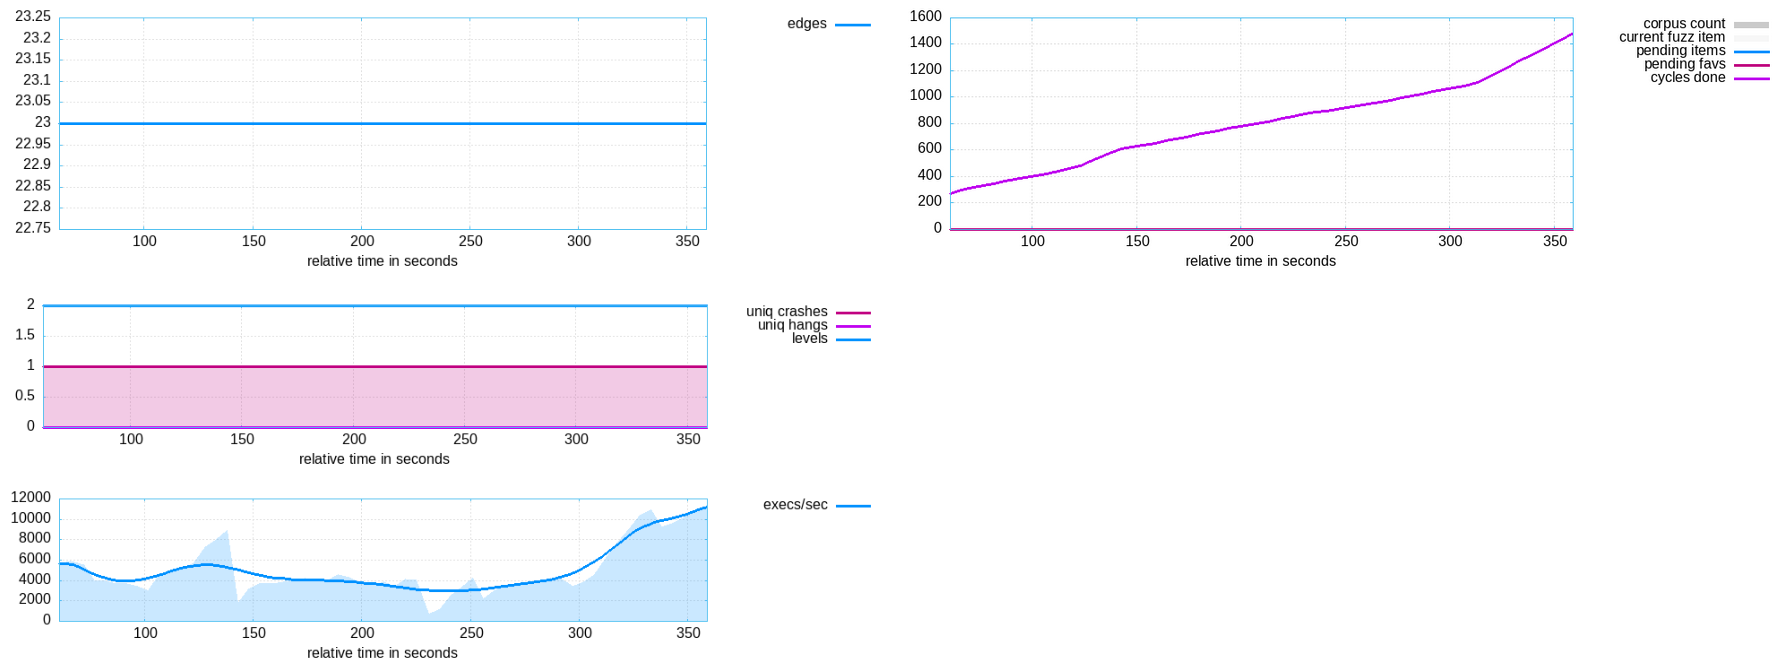
Measuring coverage
Checking coverage is another matter, with various particularities for binary-only targets. It is out of scope of this particular post, but you can find interesting resources in the official documentation.
A typical command in the context of our step6 folder would be the following:
$ afl-showmap -Q -C -i "$output_path"/afl-main/queue -o afl-main.cov -- "$target_path" /tmp/.afl_fake_input
Investigating crashes and timeouts
Once AFL++ identifies a crash or a hang, it will save the input which triggered it in a dedicated folder in your output directory so you can reproduce it.
Useful tools to understand these results can be:
afl-tminto obtain a minimal test-case reproducing the crash;- Lighthouse to explore coverage of a particular case;
- Valgrind to investigate memory issues;
- and probably many more!
In addition, for cases discovered by the custom mutator, the inputs will be in the protobuf format, which can’t easily be replayed directly on the target. For that, we implemented a simple program which allows converting protobuf back to ASN.1 (see protobuf_to_der.cpp).
Where we’ve gotten to so far
Our aim throughout this post was to highlight our methodology, explain AFL++ concepts, and provide a skeleton to fuzz binary-only targets. This led us to make choices according to our target and our own experience, which might not be relevant in other cases. In particular, other grammar mutators might be simpler to implement (e.g. Grammar Mutator if it supports the right grammar).
However, configuring in-memory persistence, tuning the bespoke grammar-aware mutations, and implementing multi-processing, we achieved to run a fuzzing campaign with interesting execution speed and coverage.
Obviously, this is only the beginning of the story: running the fuzzing campaign itself and analyzing results comes with its own set of new questions and fun!
Bibliography
Tools
- AFL++ - https://github.com/AFLplusplus/AFLplusplus
- QEMU - https://gitlab.com/qemu-project/qemu
- Grammar Mutator, AFL++ grammar-based custom mutator - https://github.com/AFLplusplus/Grammar-Mutator
- Nautilus, grammar-based fuzzer with AFL-QEMU support - https://github.com/nautilus-fuzz/nautilus
- AFL++ protobuf mutator skeleton - https://github.com/P1umer/AFLplusplus-protobuf-mutator
Papers
- AFL++ documentation - https://github.com/AFLplusplus/AFLplusplus/blob/stable/docs/fuzzing_in_depth.md
- AFL++ documentation on binary-only fuzzing - https://github.com/AFLplusplus/AFLplusplus/blob/stable/docs/fuzzing_binary-only_targets.md
- Series of posts about QEMU internals - https://airbus-seclab.github.io/qemu_blog
- Seed Selection for Successful Fuzzing - https://hexhive.epfl.ch/publications/files/21ISSTA2.pdf
- Fuzz Testing: Choosing a Seed File for AFL - https://medium.com/fuzzstation/fuzz-testing-choosing-a-seed-file-for-afl-fee4a09753c2
- What Applications Should Be Fuzz Tested? - https://medium.com/fuzzstation/what-applications-should-be-fuzz-tested-e83c77aec84a
- Preparing an Application for AFL-Fuzz - https://medium.com/fuzzstation/preparing-an-application-for-afl-fuzz-a2a838c949cb
- AFL Mutation Graph tool - https://github.com/adrianherrera/afl-mutation-graph
- The Fuzzing Book: Greybox Fuzzing - https://www.fuzzingbook.org/html/GreyboxFuzzer.html
- AFL++: Combining Incremental Steps of Fuzzing Research, a great explanation of AFL++ concepts (e.g. the fork server) - https://www.usenix.org/system/files/woot20-paper-fioraldi.pdf
- How Fuzzing with QEMU (and AFL) Works - https://galtashma.com/posts/how-fuzzing-with-qemu-and-afl-work